
This article aims to illustrate through visual examples how a team using a 3-5-2 formation should approach an opponent operating in a 4-3-3.

The focus is on identifying structural strengths and weaknesses within this matchup, and more importantly, on proposing solutions to address potential deficiencies.
The analysis is structured around six key game phases, each supported by two specific tactical ideas.
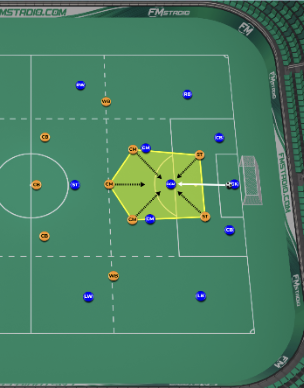
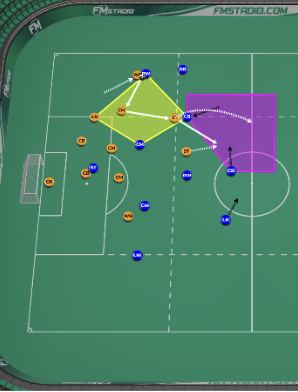
1.1) Build-Up Phase
The opponent doesn’t use an attacking midfielder. As a result, one of our centre midfielders will naturally remain free during the build-up phase. After the goalkeeper distributes the ball to one of the centre-backs who has positioned himself wider, the logical next step is to progress centrally.
Even if one of the opponent’s centre midfielders steps out to press the ball carrier, this will automatically free our other centre midfielder, allowing us to advance through the central corridor.
However, playing directly to the wing-back in this structure wouldn’t be optimal. Due to the nature of the formations, the wing-back doesn’t have a nearby supporting teammate. The distance between the centre-back and the wing-back is also relatively large. If the opponent applies intense pressure in that moment, we risk being isolated on the flank and losing possession in a structurally weak area.
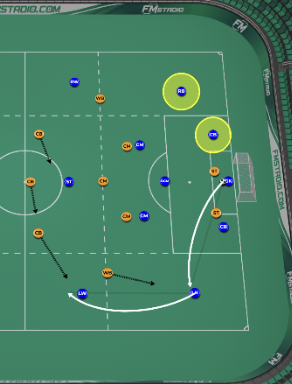
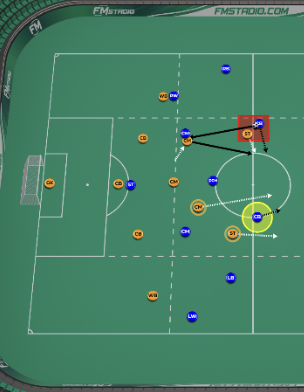
1.2) Build-Up Phase
The alternative solution is to shift the central centre-back slightly to the right or left and involve the goalkeeper to create a temporary back four in the first phase of build-up. Naturally, when we adopt this structure, the opponent’s wingers will position themselves deeper and closer to our penalty area in order to maintain numerical balance.

However, this doesn’t create a significant problem. On the contrary, it can generate advantages.
Firstly, as mentioned in the previous idea, accessing our free centre midfielder becomes even easier. The distance between the opponent’s forward line and midfield line increases, which creates a larger vertical gap to exploit.
Secondly, this adjustment improves our efficiency in wide build-up. Because the opponent’s wingers drop deeper, the horizontal distance between their winger and full-back increases. When the ball is played to our right or left centre-back, a passing corridor opens between those two players. We can use this channel to progress the ball into the second phase and break the first line of pressure in a controlled manner.
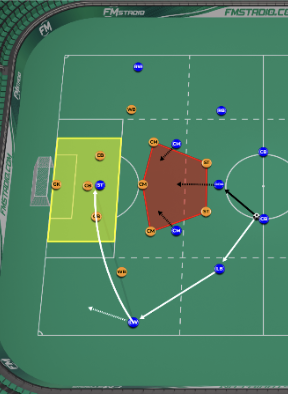
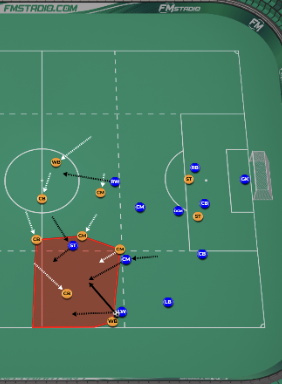
2.1) Pressing Strategy Against the Opponent’s Build-Up
The first option is to deliberately leave the opponent’s defensive midfielder free during their build-up phase.
At first glance, this may seem illogical, as it appears to allow the opponent to progress directly from the first line. However, the intention is strategic. Once the ball is played into that defensive midfielder, our five central players immediately collapse toward him.
While he may initially appear unmarked, his effective passing options are heavily restricted. He cannot comfortably access the wingers because our wing-backs are positioned to control those channels. Central passing lanes toward the other midfielders are blocked by our compact structure. A backward pass is limited due to our two strikers screening the centre-backs. Carrying the ball forward is also not viable, as our central midfielder occupies that vertical lane.
Unless the opponent possesses a high-level deep-lying playmaker capable of remaining composed under intense central pressure, it becomes extremely difficult for them to exit this situation without losing possession.
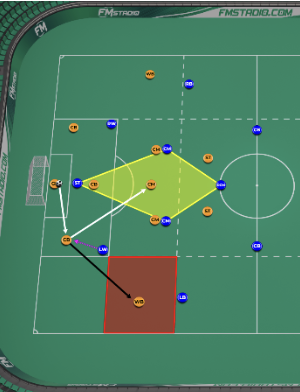
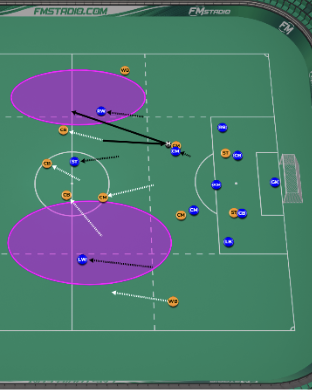
2.2) Pressing Strategy Against the Opponent’s Goalkeeper
If we decide to press the goalkeeper, the pressing angle is crucial. Our striker shouldn’t run directly at the goalkeeper. Instead, he must curve his run to block the passing lane between the goalkeeper and one of the centre-backs.
If he presses straight on, both the centre-back and the full-back on that side will remain completely free. In that case, the high press loses its structural value, because the opponent can easily bypass the first line.
By pressing with a curved run between the goalkeeper and the near centre-back, we force the goalkeeper into a different solution. Most likely, he will attempt a long ball toward one of the full-backs, since there is no immediate direct pressure on that lane.
At that moment, our wing-back must aggressively step forward to contest the ball. Simultaneously, our three centre-backs shift across in a staggered manner toward the ball side. This coordinated lateral movement ensures two things: The opponent’s winger cannot receive freely in isolation. The opposing striker cannot exploit central space behind our line.
3.1) Settled Defensive Phase
In our settled defensive phase, we adopt an extremely compact structure, sometimes positioning even our strikers closer to the first defensive zone. The objective here isn’t immediate ball recovery; it’s to protect the central corridor and deny direct access to the penalty area.
When the opponent recognizes this central density, they’ll naturally try to exploit the wide areas we appear to leave open. At first glance, not having a traditional winger in our structure may seem like a weakness. However, even when the ball reaches the opponent’s wide player, his real options aren’t as dangerous as they initially seem.
Attempting an early cross, our three centre-backs will be positioned against a single striker. This gives us clear numerical and spatial superiority inside the box. If he tries to go inside toward the edge of the penalty area, he’ll face both our wing-back and our nearest central midfielder. This makes shooting angles tight. If he chooses to exploit the outside and drive toward the byline, he may gain territory, but the most realistic outcome is still a cross from a narrow or deep angle, which doesn’t significantly threaten our structure.
3.2) Settled Defensive Phase
In this variation, we try to defend in a more aggressive manner. The objective isn’t to delay or contain, but to regain possession. When one of our strikers presses the centre-back in possession, he must position himself with awareness of the opponent’s defensive midfielder.
Our central structure isn’t as secure as in the previous model, so we can’t ignore that connection into midfield.
Once we force the ball toward the wing, the nearest centre midfielder must think beyond his direct opponent. He has to consider both the opposing midfielder he’s matched with and the opponent’s full-back, and be ready to support the wing-back. If our midfielder steps too close to the opposing full-back, he should release the striker’s marking responsibility to the other two centre-backs and step forward toward the nearby central midfielder instead.
Our wing-back mustn’t vacate the first defensive line too aggressively, because of the constant risk of a long ball played behind the defense. While the ball is at the opponent’s full-back, one of our two remaining central midfielders should hold a slightly advanced position, anticipating a possible inside pass and preparing to intercept or press forward immediately. Meanwhile, the far-side wing-back should shift slightly inward to close the central gap that may appear due to the aggressive lateral movement on the ball side.
Naturally, this level of aggression creates risk. By shifting and pressing intensely on one side, we leave the far side more exposed. The key is to prevent the opponent from playing a long diagonal switch toward that weak-side channel. Our pressing angles and compactness must be coordinated to block that diagonal option and force play into controlled, predictable zones.
4.1) Settled Attacking Phase

The first option is to play into the centre midfielder and immediately the wing-back making an advanced run, without slowing the tempo. Since we operate with two strikers, we should capitalize on numerical presence inside the box.
The wing-back’s priority in this moment should cross. The opponent typically defends with two centre-backs, and unless their full-backs collapse into the penalty area which would require one of them to step out earlier to confront our wing-back, we create a direct 2v2 aerial situation.
The second option is more central and vertical. One of our centre-backs can carry the ball forward into space and break the line by passing to the striker. Once the striker receives between the lines or just outside the box, he can turn and shoot. However, for this action to be consistently effective, the profile of the striker is crucial. Using inverted-foot strikers increases the shooting angle and allows quicker execution after receiving the ball.
4.2) Settled Attacking Phase
If the opponent defends more aggressively, progressing through the wings becomes far more difficult. Unlike the previous scenario, their full-backs won’t remain close to the box; instead, their wingers will apply direct pressure on our centre-backs.

In this case, attempting horizontal passes in midfield becomes risky, because we’re effectively in a 3v3 situation in the centre.
Instead, we should exploit the structural detail that the opponent doesn’t use a true attacking midfielder. One of our centre-backs can play directly into the central midfielder positioned between the lines. From there, the immediate objective is vertical progression. As the ball travels inside, one of our strikers should already be making a penetrating run toward the penalty area, allowing for a through pass behind the defensive line.
Another variation is to use the opponent’s defensive midfielder’s movement against them. If he shifts toward one side to apply pressure, we can quickly play into the striker positioned on the opposite side of that pressure. That striker can then connect with the second forward through a quick through pass.
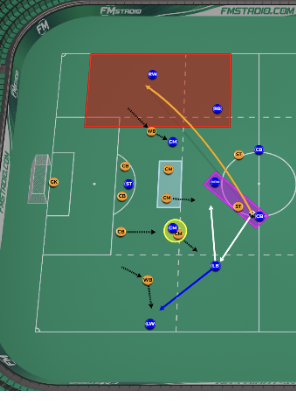
5.1) Attacking Transition
To compensate for the lack of a winger, one of our centre midfielders should drift toward the wing to provide structural support. When we regain possession on the wing, particularly if the opponent’s full-back has joined the attack, a valuable space often emerges between their lines.
This transitional gap can be exploited immediately. The first pass should target the striker positioned closest to that wing, using him as a reference point to progress quickly.
If the opposing centre-back has stepped forward during the pressing phase, an additional space will appear behind him. In that moment, our second striker, preferably the faster profile, can attack that depth with a through ball.
Should the far-side centre-back and full-back attempt to shift across in support, the striker who initially played the through pass must continue his run. By maintaining forward momentum and combining again with the advancing striker, we can destabilize the recovering back line and approach the penalty area through dynamic striker-to-striker interaction.
5.2) Attacking Transition
The first option is for the ball-winner to play into the striker who’s matched 1v1 with the opposing centre-back but not directly to his feet. Instead, the pass should be played slightly into space, a few meters away from the defender.
Delivering the ball straight into the striker under tight marking wouldn’t maximize his physical advantage. Since strikers are often quicker than centre-backs, the objective is to exploit that pace differential.
The second option involves players who are positioned away from the immediate ball-recovery zone. The centre midfielder and striker on the far side should instantly recognize the moment of transition and sprint into the opponent’s half. The aim is to create a rapid 2v1 scenario against a single centre-back. Because these two players aren’t directly involved in the defensive duel at the moment possession is won, their defensive responsibility is temporarily reduced. As a result, they’re naturally freer and more inclined to make aggressive forward runs.
6.1) Defending Transition
Losing the ball on the wing is one of the most vulnerable moments for this formation, because the risk of being numerically exposed is significantly high.
The three centre-backs must shift across in a staggered and coordinated manner toward the zone of loss. The nearest centre-back can step forward to delay, while the others provide cover and balance.
At the same time, the far-side wing-back has a crucial defensive responsibility. He must temporarily adopt the role of a centre-back. His positioning should serve two purposes: first, to track and block any unmarked runners who may attempt blindside movements into our half; second, to close the central gap that naturally appears when the defensive line shifts aggressively toward the ball side.
6.2) Defending Transition
When possession is lost in central areas, the opponent will most likely exploit the flanks. Structurally, our wing-backs are often positioned high, and the opponent’s wide players tend to be isolated during transitions. For that reason, our wing-backs must recover at maximum intensity.
The centre-back closest to the ball side must be ready to step out of the defensive line and directly engage the winger in possession. He can’t remain passive inside, because allowing the winger to advance uncontested would stretch the entire structure. At the same time, we must anticipate diagonal switches. If the opponent plays quickly from one flank to the other, our weak side can become exposed. To prevent this, either the deeper central midfielder should slide toward the far side to protect the channel, or he should temporarily drop between the centre-backs.