
Porto are moving step by step towards the Portuguese Primeira Liga title. There are several important reasons behind this potential success, and one of the main ones is head coach Francesco Farioli.
Last season, Farioli took an Ajax side that very few considered a genuine title contender in terms of squad quality and pushed them far beyond expectations, leading the title race for much of the campaign. However, the story ended in tragic fashion for him, as Ajax eventually lost the championship to their historic rivals PSV. In the aftermath of that collapse, Farioli was unable to continue in his role at Ajax.
At the start of this season, the Italian coach took charge of Porto and found himself in a very similar situation. In terms of squad quality, Porto were seen as being behind both Benfica and Sporting. Just as he did at Ajax, Farioli has once again managed to build a team that is outperforming expectations. With four weeks remaining in the season, Porto continue to maintain their points advantage over their rivals.
One of the main reasons why Farioli has been able to exceed expectations in back-to-back seasons is his ability to construct a highly organised and sophisticated build-up structure from the back. He does not merely give his team the ability to dominate possession; he also provides them with multiple solutions against different types of pressure.
In this article, I will examine in detail the 12 different build-up patterns Porto use when playing out from the back.
1) Bypassing the Front Two
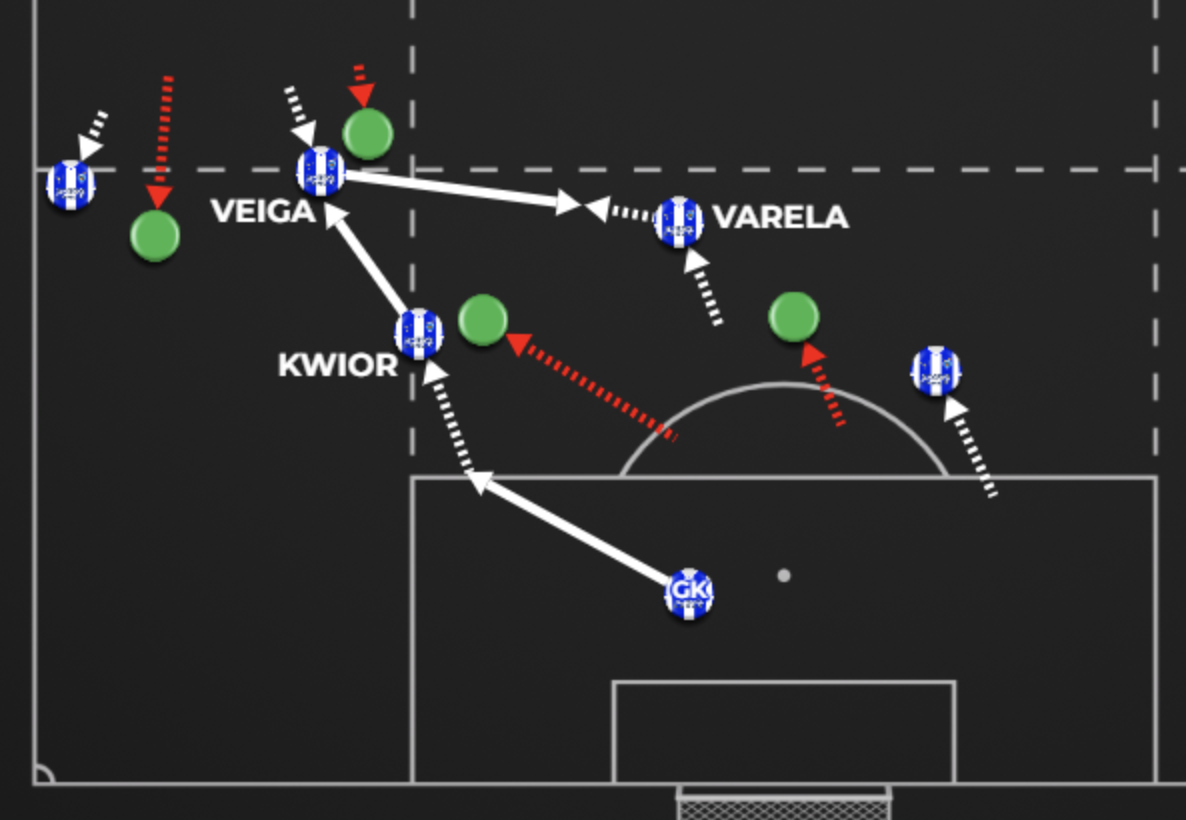
When the opposition uses two forwards to block the connection between Porto’s goalkeeper and the player dropping in front of the centre-backs, both players initially close the central lane.
Once those two forwards narrow inside, goalkeeper Diogo Costa plays to centre-back Jan Kiwior. While the ball is with the goalkeeper, Gabri Veiga, the midfielder not positioned in the first phase, drops deeper to escape his marker. He then finds Alan Varela, the other midfielder left behind the two forwards, receives the return pass, and helps Porto progress through the first line.
2) Third-Man Penetration
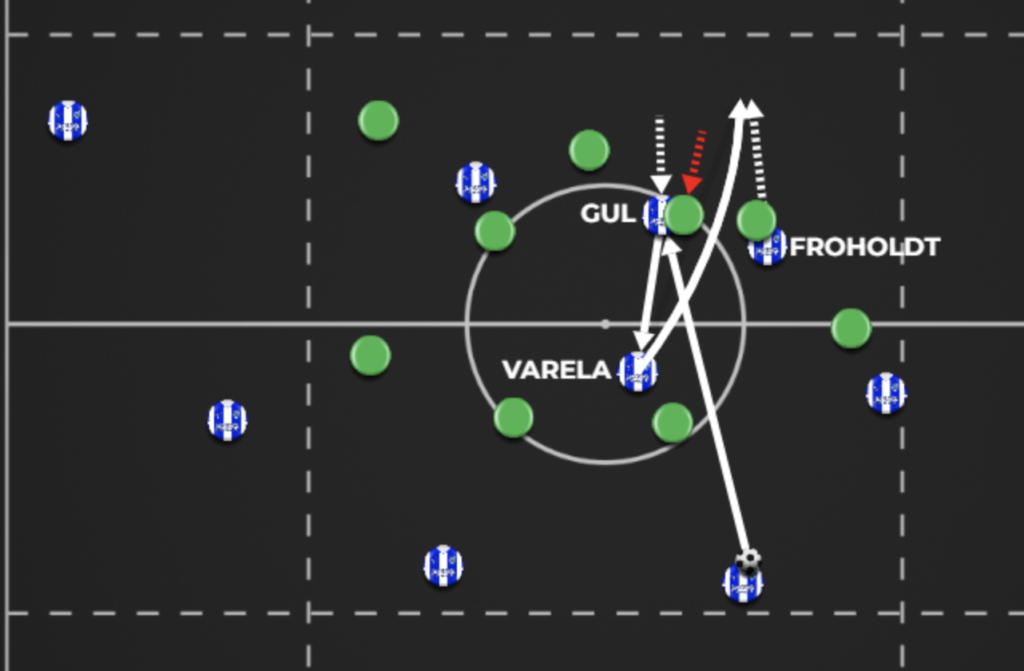
After repeating the same passing patterns several times between the centre-backs and midfielders in the second zone, striker Deniz Gül drops slightly deeper and lays the ball off to Varela, even without fully escaping the opposition centre-back’s marking. At that moment, Victor Froholdt makes a forward run into the space left behind the centre-back who has stepped out with Gül.
Varela then delivers an excellent through pass, putting Froholdt in a clear one-on-one situation with the goalkeeper.
3) Exploiting a Split Block
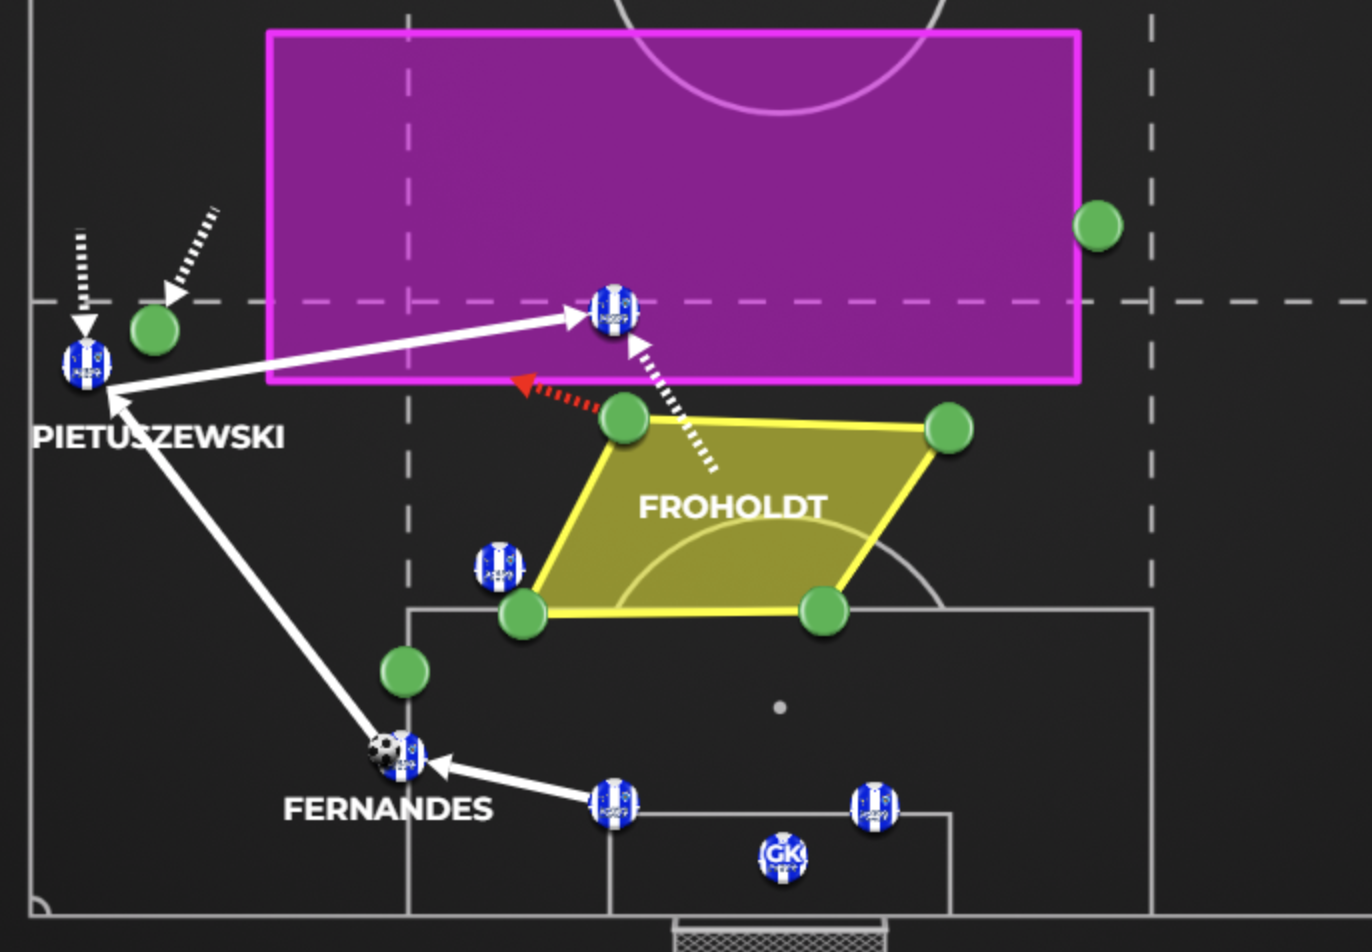
One of the most common mistakes made by teams pressing in the final third is allowing the team structure to become split into two separate units.
Porto exploited that flaw very effectively in this build-up sequence. When full-back Martim Fernandes received from the centre-backs, winger Oskar Pietuszewski moved towards him. Froholdt, meanwhile, was positioned in front of the penalty area among four opposition players, so at first glance he seemed to be in no realistic position to receive. However, he suddenly collected Pietuszewski’s pass and was able to drive into the opposition half.
4) Ignoring the Weak Side
Another key detail often overlooked when pressing high is failing to consider how the opponent will escape that area once the press is triggered.
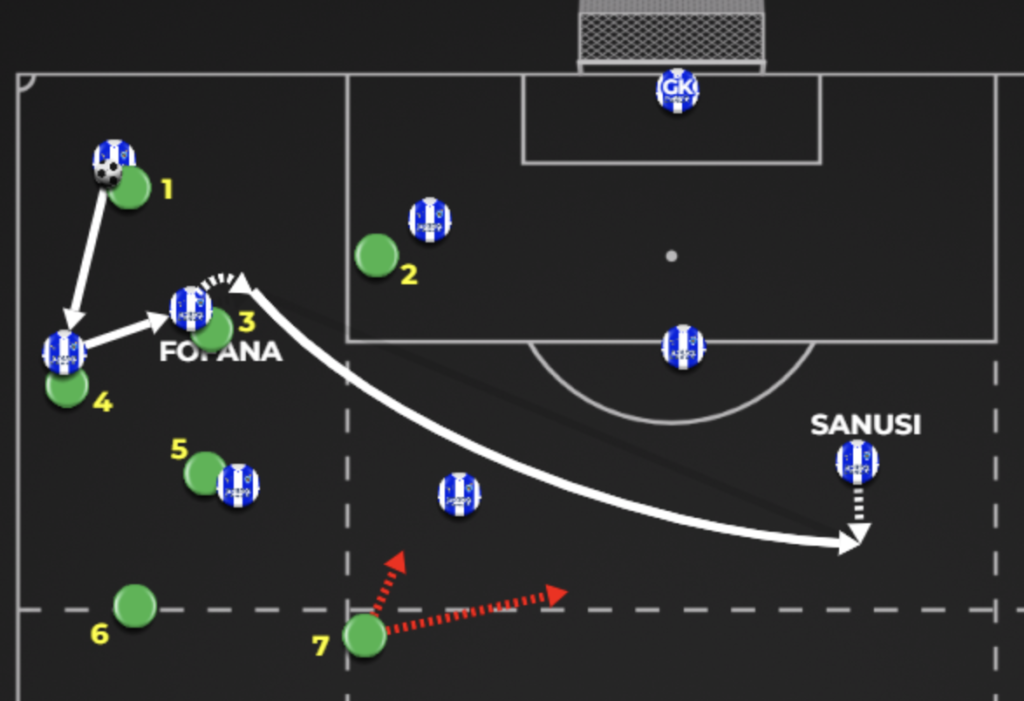
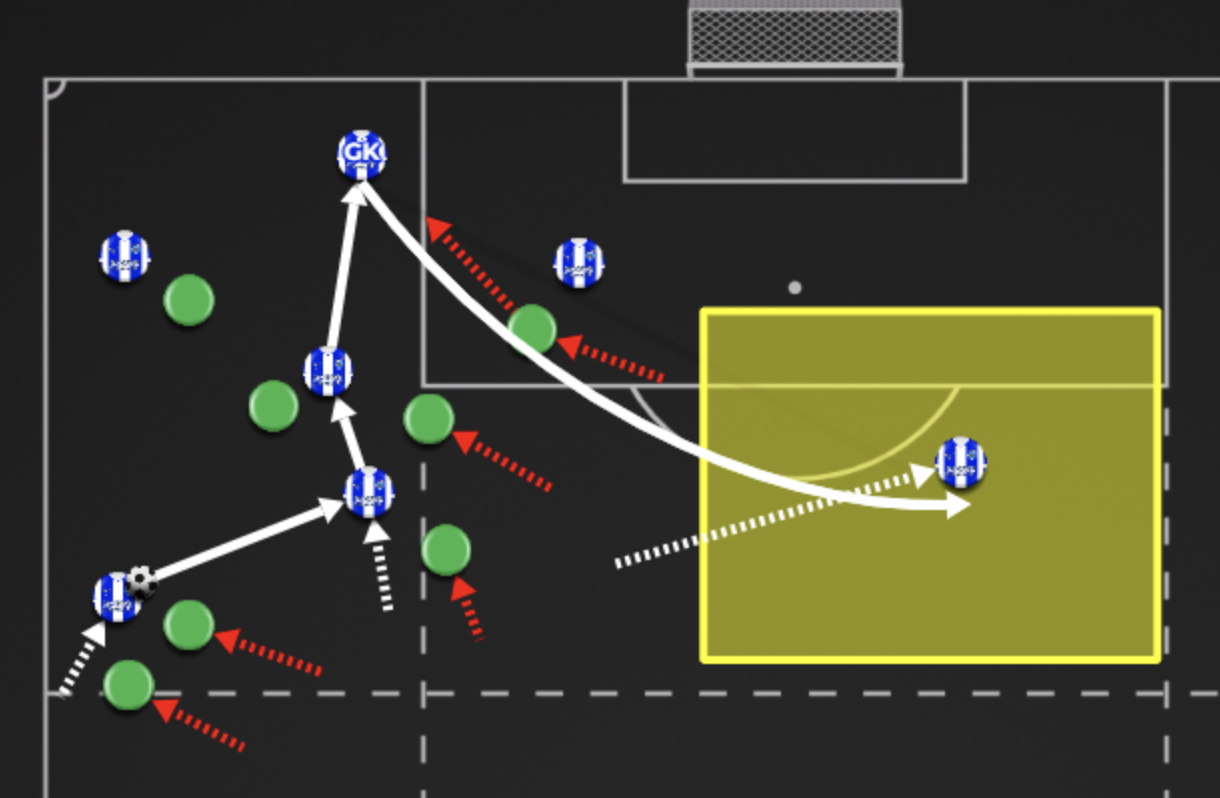
In this situation, the opposition pinned Porto into the corner with five players, while two more remained deeper in support. One of those seven players — ideally one of the deeper supporting players — should have checked Porto’s left side. After receiving the ball and turning on the half-turn, midfielder Seko Fofana plays a long pass towards left-back Zaidu Sanusi. Because the opposition committed seven players to the press, a huge amount of space opened up in front of Sanusi.
5) Punishing High Pressure

Teams like Porto, who consistently prioritize build-up in the first zone, often lure opponents into a false assumption.
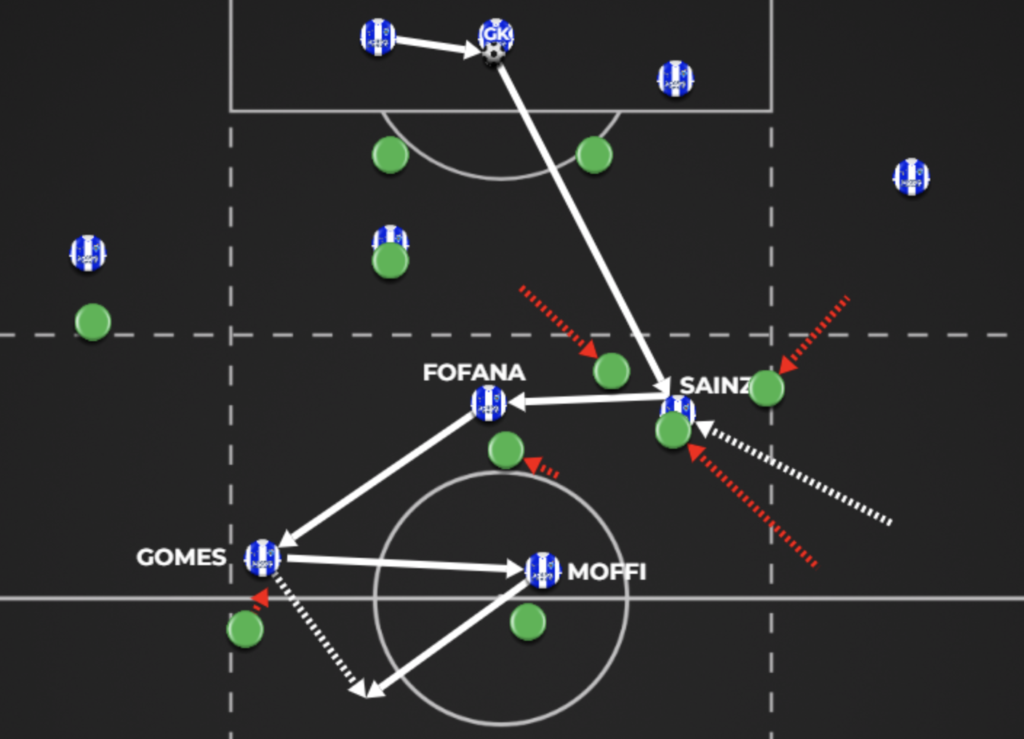
The common idea is that, if Porto are pressed aggressively, a forced mistake near their own goal can quickly lead to a scoring opportunity. As a result, opponents tend to commit large numbers high into Porto’s half. However, when you have a goalkeeper like Costa, whose long balls are of such high quality, that approach can be punished with a single direct ball as soon as he recognises the opponent’s positioning. In this situation, Porto’s attackers Terem Moffi, Borja Sainz, and William Gomes are matched up man-to-man against their direct opponents. Once Costa identifies that picture, he plays long towards winger Sainz. Because Sainz initially starts his run from a wide position, holding the touchline, he is able to attack his opponent in an isolated one-versus-one situation with a large amount of space.
6) Inside-Winger Combination
I would also like to highlight one of Porto’s build-up patterns that was unsuccessful, but still very interesting as an attacking idea.
While again trying to exploit the distance between the opposition’s lines, left winger Sainz moves inside into midfield. As Fofana looks to advance through the centre, right winger Gomes narrows into a central position, while centre-forward Moffi drifts slightly from the middle towards the left. The move breaks down because Sainz’s pass is intercepted. However, had the ball reached either Fofana or Moffi, the intention was clearly to combine through a quick one-two and break in behind the defensive line. This kind of pattern, especially involving a winger in that role, is not something you see very often.
7) Switching the Point
Some opponents accept Porto’s superiority in front of their own first zone. Instead of pressing there, they allow Porto to progress into midfield and move the game into the second zone.
Once Porto reach that zone, the aim is to block the passing lanes and regain possession there. As soon as Porto’s players recognise that tactic, they deliberately overload one side of the build-up, including the goalkeeper, to draw the opposition across. The opponent then shifts heavily towards that wing in the hope of winning the ball. When the ball returns to Costa, the only free player is the full-back on the far side. Costa finds him, and Porto restart the attack from the opposite wing.
8) Two-Steps Escape
If the opposition applies a two-step press in central areas with five players, Porto’s two central midfielders drop to the in front of the penalty area.
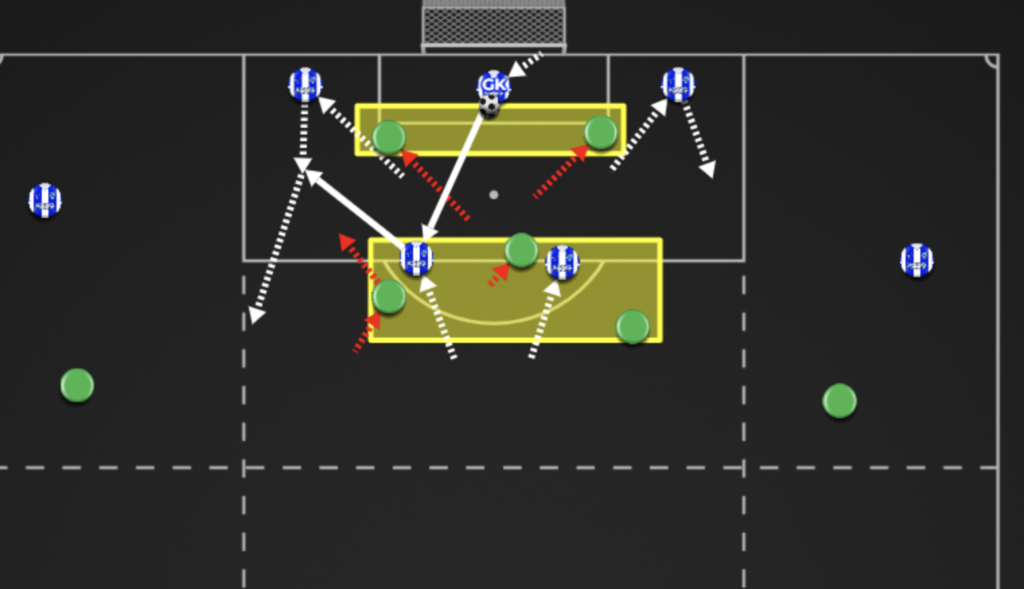
While the ball is with the goalkeeper, the centre-backs widen their positions and move closer to the edge of the box. However, as soon as the goalkeeper plays into one of the midfielders, the defenders step forward across the line of the opposition players. Because the receiving midfielder is facing his own goal, it is difficult for him to carry the play forward. He therefore lays the ball off to one of the defenders. With the defenders now positioned beyond the first line of pressure, they can carry the ball forward more comfortably or play progressive passes into the next line.
9) Pre-Planned Exit
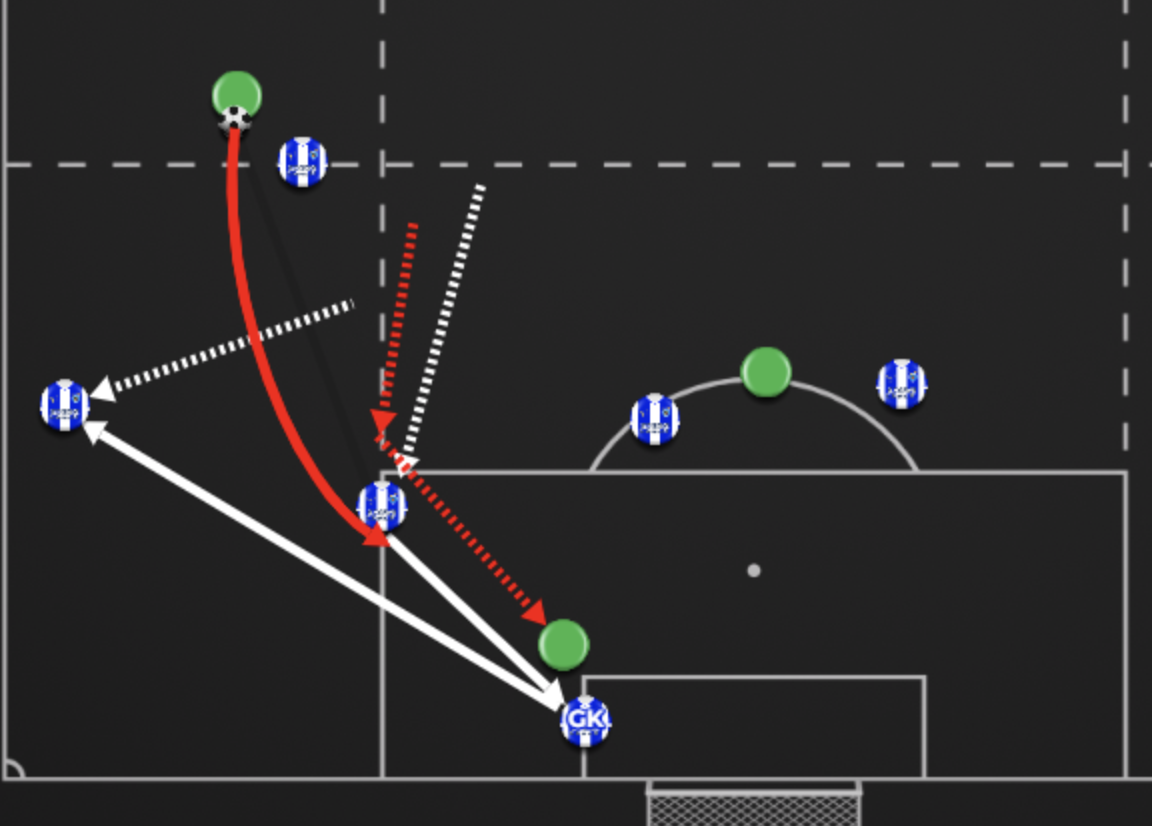
When the opposition plays a through pass into the channel between the centre-back and the full-back, one of Porto’s midfielders drops across to collect it.
The opposition winger then tries to intensify the pressure with an extra sprint, first closing down the ball-carrier and then jumping onto the goalkeeper in an attempt to force panic. But Porto’s response is clearly pre-placticed. As the midfielder plays back to the goalkeeper, another player moves into a diagonal support position. The goalkeeper then finds that diagonal option with his next pass.
10) Wide-to-Inside Progression
When Porto build in the second zone, the speed of their attacking transition increases.
As centre-back Bednarek plays into Sanusi, midfielder Rosario gradually advances into the opposition half. He then makes a run into the channel between the centre-back and the full-back. While the full-back and winger move inside, the ball is played immediately to Sainz, who is holding a wide position close to the touchline. Once the opposition full-back and winger shift out towards him, Sainz then releases Rosario, who has continued his run into the space behind them.
11) Creating the Midfield +1
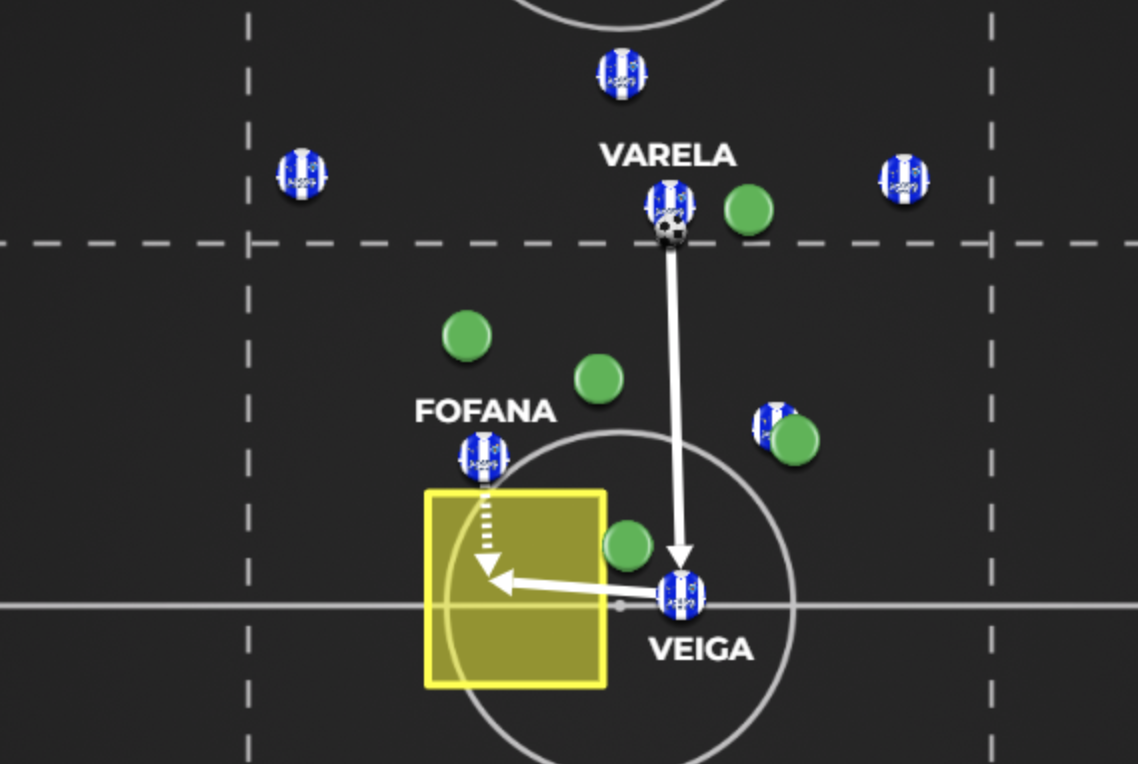
When Porto recognize that the opposition are not pressing the back line, they make a slight structural adjustment.
One of the centre-backs steps forward, while the remaining defenders move closer together in central areas. As a result, the player normally responsible for the first build-up connection — most often Alan Varela — can release that duty, giving Porto an extra player in midfield. The advanced centre-back then plays a vertical pass into midfielder Veiga. Porto use that +1 numerical advantage to progress through Fofana.
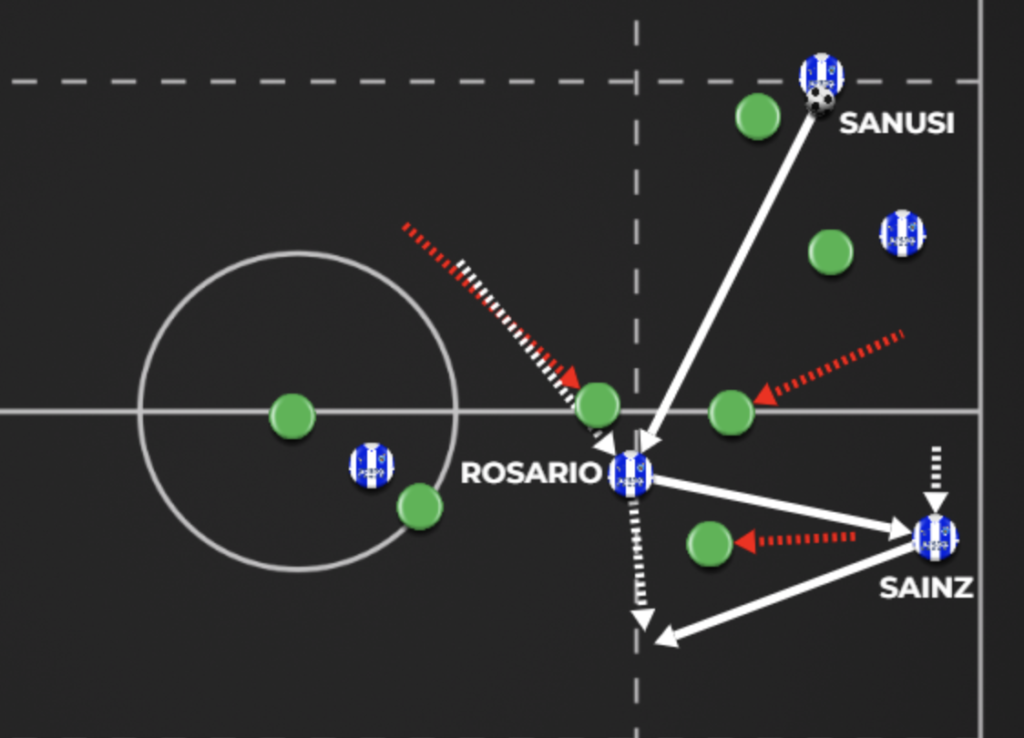
12) Attacking the Vacated Space
As Rosario plays the ball into Veiga, Fofana is completely free. Naturally, the opposition player in that zone recognizes it and steps out towards him.
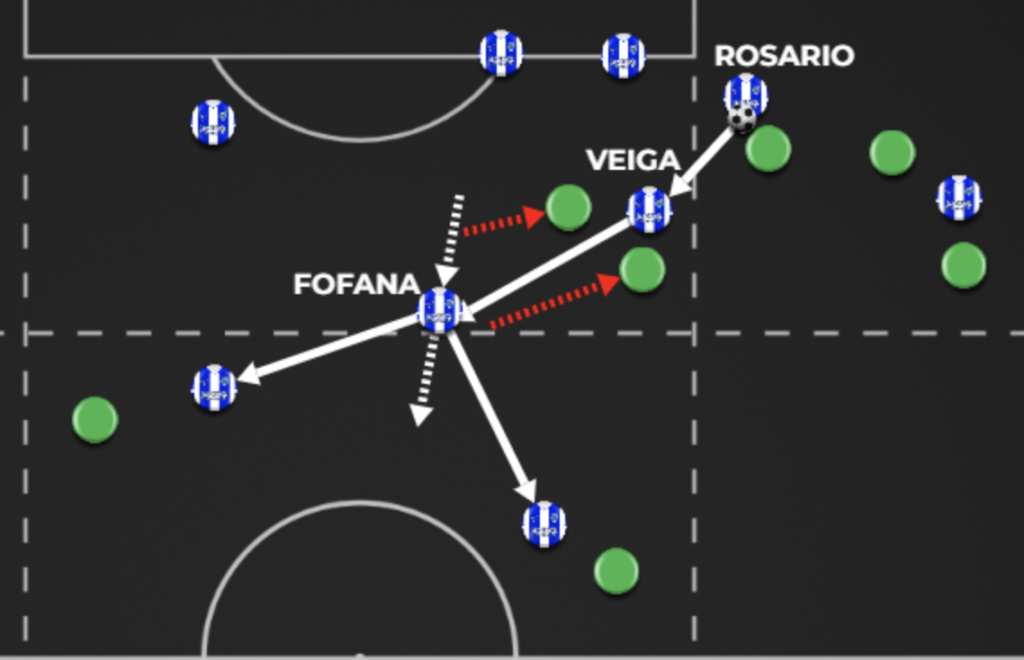
Both Veiga and Fofana read that movement immediately: while Fofana attacks the space left vacant by his marker, Veiga plays forward rather than sideways. From there, as Fofana carries the ball, two teammates position themselves to combine with him. At times, Fofana beats his man directly off the dribble; at others, he links with one of those two players through a quick give-and-go before continuing the attack.